Saturday, March 31, 2012

Compost Signs!

I finished making signs for the compost bins I built earlier.
  1. Add - put stuff to compost here (this bin is now full)
  2. Water - actively composting material (this bin is currently also full)
  3. Take - take finished compost from here (this bin is also full)

Now all I need to do is affix them to the bins.


UPDATE

I just checked on the store-bought spinach, onion, and chard plants that we planted yesterday, and the chard is already looking wilted.  I took the covers off of the hoop houses, because the high today is 87 degrees F and the low tonight is only 45 degrees F.

Growing Plants and Flowering Cucumbers

CUCUMBERS
and the
OTHER INDOOR PLANT ATTEMPTS


I am trying to sort out my concerns with my cucumbers.  I think I just have to be patient, and my plants will grow fine.  I found this video, which is fairly informative, but a little wacky:

It shows how to manually pollinate cucumbers, which is pretty cool.


I have been giving these plants a little bit of organic fertilizer mixed with water once per week.  I am watering once or twice per day.  My florescent light timer is set to keep the lights on for 16 hours, which may be too much light.


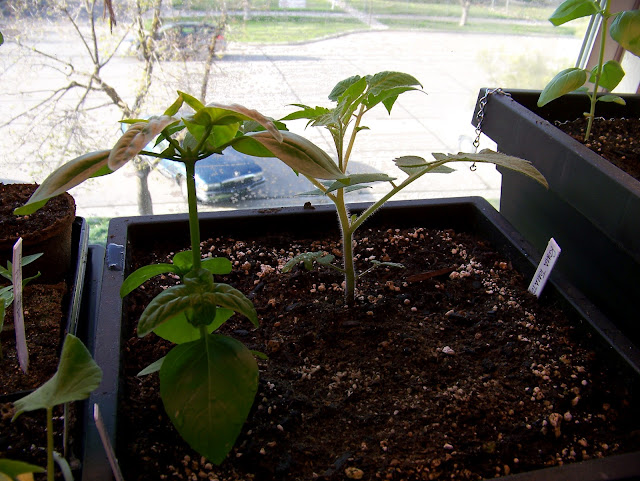
The tomatoes and basil continue to grow well.  Cropping the tops of my basil plants have caused them to make several branches of smaller leaves on the existing branches.  I think I will have to get supports for my tomato plants soon.

Current view of my rough-looking cucumbers.  Should they be flowering already?  I am seriously considering ditching these plants and replacing them with the pole beans, which are growing like crazy.


PLANTING SPROUTS

Seeing as how most of our sprouts have had a high fatality rate so far, we decided to try our luck with some store-bought sprouts.  Yesterday, we bought spinach, chard, and onion sprouts from Western Gardens and planted them in our outdoors garden plot.  We then covered the sprouts using our little hoop houses.

One spinach and one onion plant of the original sprouts that we planted are still alive.  We left them in place and tried to give them some love.  We will see how they do.

Unfortunately, the water at our garden will not be turned on until the end of April, so we will have to manually water our plants at least every other day.

It seems like the western half of our plot gets the best light, as the construction trailer is blocking a good portion of the other half.


Onion Sprouts from Western Gardens

Spinach sprouts from Western Gardens


Sunday, March 25, 2012

Compost Bins

COMPOSTING

As promised, I am posting the results of Wanda's Whispers work party on Saturday.  At the work party, the garden crew cleared out a plot for children, cleaned up the garden, and organized straw bales.  

Some of the straw we moved.
 

We also organized the compost piles at the garden.

I got an early start on the compost bins on Friday.  
On Friday, I brought all of my power tools, including screws, a power drill, and a circular saw. Unfortunately, the construction crew at the Unitarian Church was using all of the outlets, so I started the compost bins using just hand tools.  I had to pull old nails, hammer them straight and then hammer them into place.

On Saturday, I was able to run an extension cord and finish the bins using my drill and saw.  The left-most bin was fairly impromptu.

I plan on making engraved aluminum signs to direct where to add to the compost and where to take from the compost.
  
Here are some decent sites on how to compost:

The finished compost bins.  The bin to the left is the add bin, and the other two are actively composting.

Cortney (sp.?) and Joan made nice layered piles of N-rich material and C-rich material.

A close up of the "add" bin.

We bought an under-the-sink compost bucket to add our food scraps to the pile.


PLOT UPDATE

We planted our onion and brussel sprout sprout today.  We also planted some garlic cloves.  We covered our newly planted crops with our hoop house.  Our other plants that we planted seem to have died. We have a couple of spinach plants hanging in there.  A construction trailer is blocking a large portion of our light.  


We plan on adding spinach and kale starts (store-bought) next weekend.

Before
After


INDOOR GARDEN UPDATE


My cucumber plants are looking extremely rough.  The leaves have speckled brown spots on them.


The cucumber plants are creating flowers and little vines.  The vines are slowly winding around the cord I strung up earlier.


My basil and tomato plants are growing slowly.


The squash plants are outgrowing the peat pots and will need to be replanted soon.

I have several pepper plants that are growing well.


The pole beans are trying to vine up my light chain.  I am going to have to figure out what to do with these.


Sunday, March 18, 2012

Garden Meeting

Wanda's Whisper community garden members met a the plots today.
We decided to clear space for two more plots in the garden.  Also, we reaffirmed plans to meet this Saturday for a good-ol'-fashion shed raisin' (not to be confused with other types of raisins).

I volunteered to build a pallet compost bin for the garden, so hopefully I will post that soon. I want to make a three-bin system, where one bin is actively collecting new material, the next bin is composting, and the third bin is ready-to-use compost.

I am beginning to reconsider our garden layout, as a trailer is blocking a good portion of our sunlight.  Maybe we will try to squeeze in some green leafy vegetables before we officially have to plant (end of May).


Friday, March 16, 2012

Outdoors Update

On Saturday, March 10th, we sentenced three healthy tomato plants and two basil seedlings to death.  We put the seedlings under a hoop house hoping it would properly insulate the plants from the cool temperatures of night.   

However, we failed to properly warm the soil in which we placed the baby plants.  The soil was so cold that is was frozen, and needed to be broken up using a rock hammer, but we were still crazy enough to put seedlings in it.  I think our spinach will pull through, but we have yet to see any beet or kale seedlings poking through the icy soil.  The tomatoes and basil are definitely dead.

My uncle Fred recommended a hotbed method of germinating seeds:

1.  Build a small cold-frame box  - basically a window surrounded by riser boards.
Here are some nice sites for cold-frames:
http://extension.missouri.edu/p/g6965

2.  Pre-warm the soil using the cold-frame.

3.  Put  a layer of manure about 8 inches (20 cm) below the surface.

4.  Cover the manure with soil and plant the seeds in that soil.


Building a little hoop-house.

A picture of our garden plot right before we planted.

Our completed hoop-house cost less than $15.

We planted the seedlings before the automatic irrigation started in the community garden, so we have to resort to manual watering until the irrigation starts.


INTERESTING TIDBITS

Mother Earth News did a pretty nice article on container gardening.

My uncle told me about an awesome seed site that has affordable prices.  Support them as they (and others) go through a lawsuit with Monsato.


Garden Update! Trellis and Beanstalks!!

I'm Baaaaack!!!

Sorry for the delay in blogs, but I have been out of town at a water conference, so I didn't have an opportunity to write a riveting blog for y'all's entertainment.

Did you know that Thomas Jefferson grew over 70 species and 260 varieties of vegetables?!?!?  He also recorded careful measurements of his efforts.  I am envious of his tedious nature, but I am pretty sure he had several people to help him.

In an attempt to partially emulate ol' Thomas, I started this blog, hoping to carefully record my efforts in gardening, and in the spirit of doing so, I will give you an update of how things are going.  My plants are growing faster than I can blog, so sorry if I missed some stuff.

Bean stalks (in forground)!!! I bought the seeds from a magic man I met in a mystical alley (lies), so they might lead me to a giant's cloud-based fortress to a goose that lays golden eggs.  These bean plants are growing like gangbusters, whatever that means.

My other seedlings are doing well, too!  I need to replant them immediately, as they have outgrown the tiny plastic pits in which I started the seeds.

The cucumber continues to grow, but the leaves are looking rough.  The soil may be draining too effectively, leaving the roots dry.  Also, I did try watering these plants using drainage water I siphoned from the pan, which may have something to do with the dying cucumbers.

It is hard to see in this picture, but I added some hemp "trellis" for the cucumbers to vine on.  I drilled holes in the lip of the container and strung the hemp cord up to a hook near the top of the window.

The tomatoes and basil seem to be growing, although at a fairly slow rate.

As per some excellent advice from our friend Angelie, we went out and bought a watering pale.   It should lessen the impact of soil disturbance.  However, this pale kinda sucks because the head on it leaks.


Coming soon......an update of our outdoor operation!!! Just to warn you, it looks dire!


Friday, March 9, 2012

Leggy Plants

Our seedlings continue to sprout and grow on top of the fridge.  


I noticed the stems on the seedlings seem longer than they should.
I did a little "research" and determined that the jargon term for long stems is "leggy."


Ehow suggested the the light source remain as close to the plants as possible to keep them from being leggy.

Garden-know-how suggests that plants will attempt to grow towards a light source, so they become leggy in an attempt to find light.


I read on one tomato website (I don't remember which one) that repotting the tomato seedlings with the root upside-down and true leaves vertically up, so that the long stem is bent into a "U" shape.  I don't know if this works for other vegetables or not.


Pole-beans!!!


Leggy Plants


Wednesday, March 7, 2012

SEEDS

S  E  E  D  S  !

In the earlier post. I made some mention to picking out seeds.  As I go deeper into the rabbit hole, I find that every aspect of gardening has an intense amount of detail.

I find that some subject-specific posts will be interesting and add value to my garden venture.  


Some people are desperately trying to preserve the seeds of our past.  They have created things like seed vaults to save the seeds that have been replaced by genetically modified, pesticide resistant, mono-varietal vegetables.  Seed vaults all over the world are preserving valuable seed varieties that have been around for several generations.  The seeds of our ancestors are known as heirloom seeds.

Thomas Jefferson prided himself in growing novel varieties of plants, and managed an extensive garden.  Thanks to heirloom varieties, you can grow a garden using the same varieties that Thomas Jefferson used in his Monticello garden.

Monticello garden.  From the Gardenrooms blog.


I am glad there are people out there that care enough to preserve the diversity and heritage of our food plants.  Some even go as far as to revive prehistoric plants, such as the awesome 30,000-year old flower that Russian scientists recently revived.

A 30,000-year old piece of fruit made this possible.  I can learn a few things about germination from the people who grew this.  Picture from the Los Angeles Times website; check out the site for a decent version of the backstory.

However, let me make it clear that I have respect for hybrid plants, too.  I like the idea that we know enough about plants to selectively breed them to be drought, pest, and frost resistant.  It reminds me of the awesome contributions of Mendel (not Howie Mandel) and his peas.


 When selecting seeds, it helps to plan ahead.  As I outlined in the earlier post what varieties were good for the area in which I live, but when going out to find those seeds, I had a hard time.  Seed catalogs are excellent sources for finding heirloom varieties.  I would recommend Mountain Valley Seeds.  They are local to Salt Lake City, and they have an excellent variety!


Update and Plot Sprouts

On Sunday of this last weekend, I planted some seeds indoors to start our plot.
I used a seed tray and mini-greenhouse that my friend/neighbor, Sean Hennessey, gave me.
I put the seed tray on top of the refrigerator, in an attempt to keep the soil warm enough for germination.

Well, before I even had the chance to post the fact that I planted the seeds, I got some new sprouts!!!  It seems like all of the cold-weather sprouts are popping up.  
So far, we have kale, spinach, and brussel sprouts, sprouting!!!


Here is the seed tray, as I prepared it on Sunday.  I used a combination of the Jiffy seedling soil and the  original starting mix that we bought.  I am a little worried, because when we watered the seeded soil, the soil was churned up quite a bit.

The seedling tray also came with a cover, to preserve heat and moisture.  Sean was also nice enough to provide us with a  tray for our soil seedling tray.


Two brussel sprout, sprouts!!!!!

SPINACH!


Most exciting of all, we finally have pepper sprouts; although we only have two,.

UPDATE!  UPDATE!  UPDATE!

Our tomato plants continue to grow.  I think I will put these into our garden plot as soon as it stops frosting.


Our repotted basil and tomato plants seem to be doing well.  However, I am concerned that some of the stems of our baby plants are too long. 


Our cucumbers are doing great!  The soil in this pot still drains too quickly.


Monday, March 5, 2012

A Load of Manure


A compost bin is a good way to keep food scraps and green waste from going into the landfill.
Compost piles can provide nutrient-rich amendments for your garden soil.

We have a have a compost pile at Wanda's Whispers Garden, so I started thinking about what is "OK" to put into an organic compost pile.

The recent organic gardening class I attended, and learned that compost should contain a 50/50 mixture of "browns" and "greens."  Greens are nitrogen-rich materials, like grass clipping, leaves, plants,  manure (not carnivore), and veggie scraps.  Browns are carbon-rich materials (straw, sawdust, and wood chips).  Check out a very informative website on composting for a comprehensive list of nitrogen and carbon based materials.

Make sure you don't put meat products, greens covered in pesticide (like treated grass clippings), or carnivore droppings in your pile.

There are several websites on how to make a compost piles, like this one, or this one, or this one.  I like the three-bin compost piles: one for active composting, one to add to, and one to take from.


WORM BINS

There is also vermicomposting, which is using worms to help make compost.  Worm bins are especially nice for small spaces, when compost piles are not feasible.

Information on composting using worms. Also, check out how to make a worm bin! If you don't like that one, try this one!

If you are feeling lazy, you can buy one:


POOP

Manure is a good supplement for compost and gardens.  Make sure it has some time to break down before you apply to your plot.  If you apply it directly, give it at least a month before you plant.  


We applied manure from the city carriage stables to some of the community garden plots this weekend.  We mixed it with some fall leaves and compost.


Book on Organic Gardening:


I made a map of places to find compost and manure:

View Compost and manure! in a larger map