Friday, August 22, 2014

Aqua and Hydroponics

Lately my interest has peaked in aquaponics and hydroponics. As a hydrogeologist, I like toying with the concepts of dissolved nutrients in water, and how the parameters of water can influence the biosphere.

Hydroponics

Hydroponics is a method of growing plants without soil, using nutrient-enhanced water.  Commonly, the plants will root in a growing medium, such as sterile pellets, or be embedded in floating mat.  Hydroponics is a form of geek gardening that allows for precise control of most of the variables controlling the viability of the plants.  You can decide the exact nutrients that the plants get and decide how frequently the root system is exposed to water.  Some gardeners prefer continuous root exposure to water, while others alternate between cycles of saturated and unsaturated or use a drip line to provide water.  


A simple drip hydroponic setup using a rain gutter.  The gutter is usually filled with a growing medium like expanded clay pebbles or rock wool.  Nutrient-rich water is pumped and dripped to each plant.  The gutter is oriented in a way that allows for gravity drainage of the water back to the bucket. From: Gregory Axt.


Some of the lease expensive hydroponics setups use PVC or rain gutters to hold their plants and network water. The PVC system pictured is likely a Nutrient Film System, where a shallow, slow-flowing stream of nutrient-enhanced water is circulated through the pipes. From homestead-hydroponics.


A basic ebb and flow hydroponics setup, where the growing medium is periodically flooded and drained.  Nutrients are generally added in the reservoir. From hydroponics simplified.

In many hydroponics systems, the plants are suspended using a plastic mesh net pot.

A Water Culture System.  The plan roots are continuously saturated in nutrient-enhanced water. This is one of the least expensive hydroponics systems to build, as it only requires an air pump and an air stone. I have seen people build small water culture systems that only require a coffee can or five gallon bucket.

Generally, an air stone is introduced into the reservoir to add oxygen into the water and to prolong dissolution of the nutrients.  While plant use carbon dioxide for photosynthesis, their roots require oxygen.

Aquaponics 

Aquaponics is a type of hydroponics that uses fish to provide the nutrients required by the plants.  Oftentimes, a special type of fish food is used to help promote an ideal nutrient balance for the plants.  Commercial-scale aquaponics systems actually grow both edible plants and edible fish.  However, most smaller-scale home aquaponics systems use less palatable fish such as goldfish.  I like aquaponics because it promotes the concept of symbiosis, where plants rely on the fish waste for nitrates and the fish need the plants to eliminate/reformulate those nitrates.  Because fish are providing the nutrients for the plants, you want to use high quality fish food designed for aquaponics.

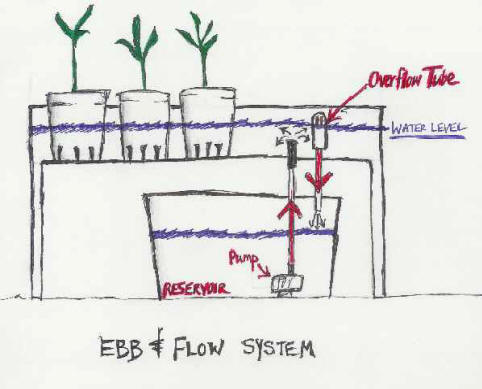
Basic aquaponics setup from DIY aquaponics website.  This is a variation on the ebb and flow system and includes a self-draining bell siphon. Here are some excellent instructions on how to build a self-draining bell siphon for an aquaponics ebb and flow system.


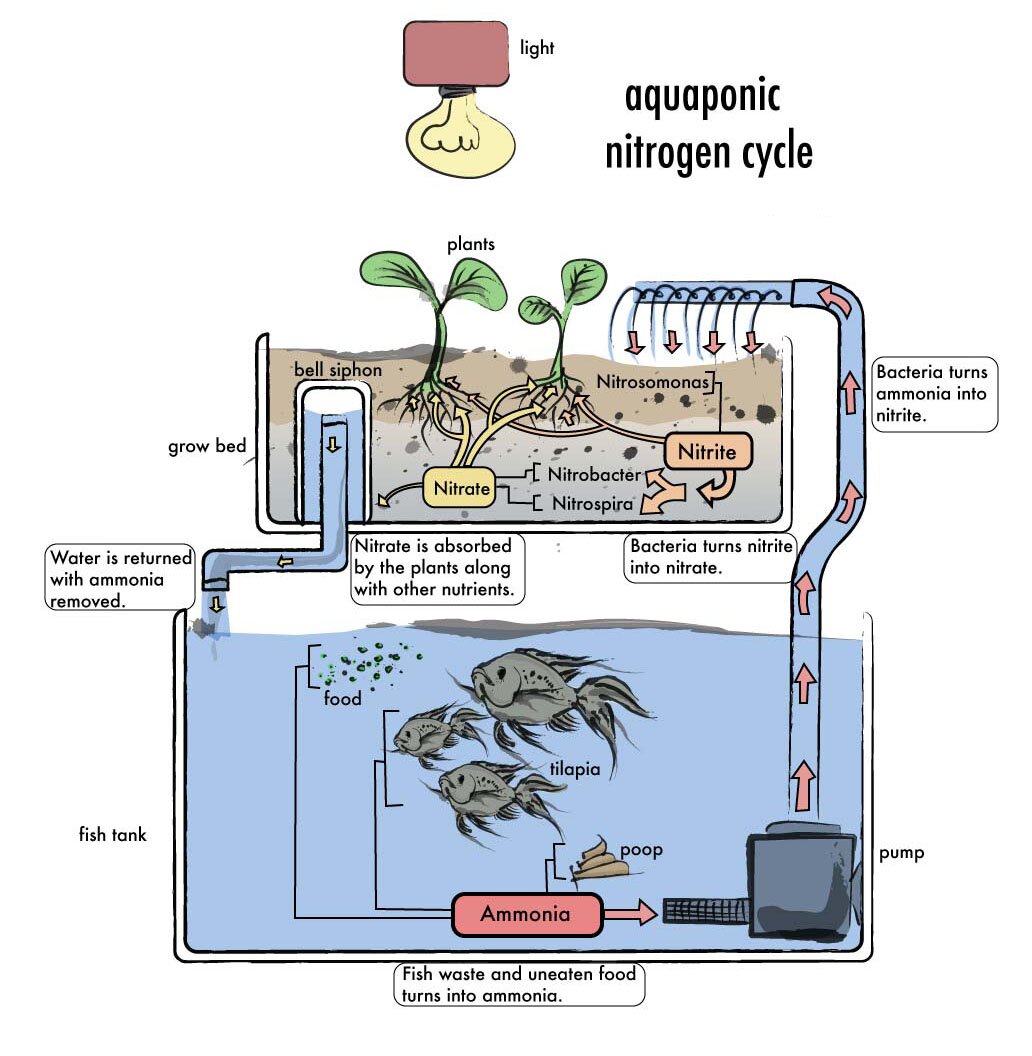
This is an excellent graphic of the aquaponics nitrogen cycle from the Backyard Aquaponics website.

The size of aquaponics systems can vary dramatically.  Backyard Aquaponics offers free plans on how to build these cool barrel systems.
The addition of an aquarium water heater to an aquaponics system could help enhance yield and growth rate, as well as growing season.

Aquaponics relies on bacteria to convert the nitrate into a usable form.  Creating an area for those bacteria to grow makes these systems more effective.  This guy used a filter that promotes multiplication of these bacteria.

For more information about aquaponics, check out this awesome guide by Backyard Aquaponics.
Colorado Aquaponics also wrote a nice presentation on the subject.

Aeroponics

A variation on hydroponics is aeroponics, where roots are exposed to air. This technique can enhance root growth.

A cross section of the Tower Garden aeroponics system.


An aeroponics setup from user GpsFrontier on the hydroponics-online forum.

Links

Window Farms hydroponics
Hydroponics setups for cheap on Instructables.
Another aquaponics manual
Aquaponics nutrients
More on aquaponics nutrients


Sunday, August 17, 2014

Garden Update

"A garden is never so good as it will be next year."-- Thomas Cooper
We have started harvest season.  So far, we have harvested basil, lettuce, kale, a couple of beets, a handful of peas, Armenian cucumbers, and cherry tomatoes.  Our peas and beans did poorly this year, and we only grew one pole bean.  However, a few of the other plants did better.

We just harvested most of our basil.  I missed one plant and left a few leaves on the other plants in hopes for more basil this season.  Brooke turned all of the harvested basil into pesto.  She used organic spinach, garlic, fine aged sheep's cheese, and olive oil in her pesto.
I have started planting for a late fall harvest.  So far, I have planted beets and carrots in my containers and raised bed.  Root vegetables like good drainage.  I am watering the containers daily for 8 minutes - just long enough to saturate the containers.
We thought this plant was broccoli, but now I am pretty sure that it is Brussels sprouts.  I am going to trim back the lower leaves to see if I can promote growth on the little leaves.
Our pop-corn was a slow starter.  Only two plants survived.  I hope that two is enough for a little bit of pollination, otherwise we will have no corn.
The tomatoes have outgrown their supports.  Although there is a lot of greenery on my tomato plants, there are few fruits.  I am going to use my own advice next year when growing tomatoes.
We have baby asparagus plants!!  In two or three years, we may be able to harvest a couple of stalks of it.
Here is our trusty watch-hawk as scale for the asparagus.
Our squash trellis is awesome!  I love it.  My squash no longer dominate all of my garden space, and most of the fruits are lifted off of the ground.
So far, we have harvested several large Armenian cucumbers, most of which have become cucumber salad.  Does anybody have a decent Armenian cucumber recipe?  We might try pickling the leftover cucumbers.  I hear that they are not actual cucumbers, but muskmelons, which is why I might be having moderate success with growing them.


Overall, I am very happy with our garden progress!

Friday, July 25, 2014

Tomatoes!

Introduction

The keys to increasing tomato plant yield are:
  • Sun and heat
  • Fertilizer
  • Carefully select the breed
  • Prune and support
  • Water correctly
  • Limit Disease
  • Bury deep
I describe each one of these important aspects of tomato growth in detail below.

Sun and Heat

Tomatoes, originating from central America,  are tropical plants, and require significant amounts of heat and sunlight.  Tomatoes require 8-10 hours of direct light to grow and fruit properly.  In high-heat areas, it may be good to partially shade fruit-bearing tomato plants in the afternoon to prevent the fruit from being scalded by the sun.

Shade for plants on a hot day.  From: http://angelvalleyfarm.wordpress.com 
Tomatoes require warm weather to grow fruit, and definitely do not tolerate cold weather well (with the exception of some special breeds).  Northern Utah has a frost-free period of about 140 days, which isn't much time to grow things like tomatoes, especially when you want to keep the tomatoes coming.

One way to extend the growing season is by housing your tomato plants in a high or low tunnel.  Tunnels allow for heat retention at night when temperatures drop.  They also keep rain off of the plants, which decreases incident of foliar (leaf-based) diseases.  While tunnels and row covers do prolong the growing season, they can limit the amount of usable solar energy available, and increase humidity, which can in turn increase disease.  To built a self-ventilating tunnel, check out this blog post.

Examples of low tunnels from The Organic Gardener.
While some would argue that it deters from true organic gardening plastic mulch has been proven to increase yields in tomato plants.  Mulch in general is a good idea for all gardens, as it helps the soil retain heat and moisture.  Soil heat is very important for generating good fruit yields.

For more information about tunnels and tomatoes, check out these links:

Fertilizer

Tomatoes are known as "heavy feeders" and require a significant amount of nutrients to grow.  Keep in mind that certain types of plant fertilizer or excessive amounts of fertilizer can "burn" the plants, which can hurt your yield.

If you are serious about growing massive amounts of massive tomatoes, then I suggest starting the fertilizing process by getting your garden soil tested by your local extension service.  Utah State University provides extension services in Utah, including soil testing.

The most important nutrients in the vegetable gardening world are nitrogen, phosphorous, and potassium.  These nutrients are commonly listed on fertilizer bags as N-P-K (see below).  Basically, nitrogen assists the plants in leafy growth, phosphorous increases fruit and flower production, and potassium supports root development.  Gardenstuffs has a good summary of what types of nutrients plants need and when to apply them.
The Zone 10 website has an excellent illustration and description on how to read the numbers on fertilizer bags.
In terms of tomato growth, I suggest using nitrogen and potassium-rich fertilizer when you first plant the tomatoes, then using phosphorous-rich fertilizer when the flowers and fruits are beginning to develop.  Using too much nitrogen later in the tomato plant's life cycle will create abundant leafy growth, which robs energy from fruit development.  Calcium is also a good supplement for tomatoes, as it reduces blossom rot.  It should be amended into the soil when the tomato seedling is planted.

I like using the following organic fertilizers for my tomatoes, as suggested in the video below:
Here are some other sites that have tomato fertilizing tips:
As a note based on a comment I received on this post, I should mention use epsom salt as applied to the soil or as a foliar spray.  Studies have shown that applying dilute epsom salt could promote plant vigor and make for larger fruits. There is still some question as to how effective this is, but it doesn't hurt!  Read this article from the National Gardening Association for more information.

Watering

The best way to water tomatoes is via a drip irrigation system.  Overhead watering systems make the leaves wet, which could promote fungal growth. Tomatoes are heavy drinkers and require water frequently and at extremely regular intervals.  There is some debate as to the quantity of water applied. I have talked to a couple of gardeners that recommend an inch per week. Tomatodirt has some excellent tips on watering.  I water three times per week for two 20-minute intervals.  I do two separate intervals to allow the water time to infiltrate into the soil.  I talk about my irrigation system in this post.

Tomato Types

Sauce, Slicer, and Cherry


In terms of what the tomato will be used for, there are three main categories: sauce, slicer, and cherry. Slicers are big and beefy, appropriate for sandwiches.  Sauce tomatoes has less water content and are commonly used for sauces and pastes.  Cherry tomatoes are self explanatory.

Indeterminate vs. Determinate

The differences between these two categories of tomato will be important when supporting your tomatoes. Indeterminate tomatoes will have fruits that ripen at different times, and they will continue to grow until the first frost.  Indeterminate tomatoes can be trained to grow vertically.  Determinate tomatoes are more bushy and have fruit that ripens all around the same 2-3 week interval. The following video describes the differences between determinate and indeterminate tomatoes.
In terms of producing the largest yield, I suggest growing indeterminate tomatoes.  Even though they the fruits on the indeterminate varieties do not all ripen within the same, they continue growing and producing fruit until the first frost.  They can be trained to grow vertically easily in small spaces.

Heirloom vs. Hybrid


Heirlooms are seeds that have been selected from the best performing plants for several generations.  Hybrids are from different varieties that have been intentionally cross-pollinated.  Heirlooms generally have better flavor, but hybrids are generally more disease resistant.  You can reuse the seeds of your heirloom fruit knowing that they will essentially grow the same variety of tomato, but hybrids may produce different results. I usually grow both heirlooms and hybrids so that I do not put all of my eggs in one basket.

Heirloom related links:

Varieties

There are hundreds of varieties of tomato.  Rutgers New Jersey Agricultural Experiment Station has a huge list of tomato varieties. It is important to take some time and talk to local gardeners and your extension agents to see what varieties do best in your region. Mother Earth News provides some guidance as to what varieties do be in the Utah region and other parts of the United States.

Prune and Support

Suckers grow between the main stem and the side stems.
from: http://www.tomatodirt.com/pruning-tomato.html

If pruned and supported properly, indeterminate tomatoes can produce insane amounts of tomatoes.  I recently summarized plant supports in this post. Lately, I have been favoring the string and sucker technique in growing tomatoes.


Prune the suckers from the tomato plants.  Suckers grow between the main stem and the branches.  They can divert important nutrients away from the fruits.  It is especially important to prune suckers if you are planning on using string as a support for your tomato plants.
Determinate varieties of tomato plants do not require such rigorous pruning.  For these, I suggest large, sturdy tomato cages.  The organicgardening website has excellent instructions on constructing sturdy cages from cattle panel.  Most of the panels for sale at the hardware stores are inadequate.

Some other links regarding tomato support:

  • Finegardening has a good video on pruning tomatoes to a single stem.

Limit Disease & Pests

I am not well versed on dealing with insects and fungus yet, but I do know a couple of tips regarding this:
  • Rotating your tomato crops not only limits disease, but it also allows for soil rehabilitation between crops.
  • Limiting moisture on the leaves will significantly reduce fungus from growing on the leaves.
  • Trimming off leaves that look diseased or curled might also limit the spread of disease.
I
Borage (blue flowers) are said to deter the moth that produces tomato horn worms.  Tiny flowers, like those of dill and Queen Anns Lace, attract the Braconid wasp, which is a parasite of the evil tomato horn worm.

Bury Deep

Roots of a plant take in nutrients and provide the plant with water.  Unlike some other plants, if you bury the stem of the tomato plant, it will produce roots.
root growth from tomato stems
from: http://www.tomatogrowing.co.uk/topical-tomato-tips
Burying the stem of the tomato plant allows for additional root growth, which in turn allows for greater water and nutrient uptake.  Some suggested burying the stems horizontally.  At first I thought this was a wacky idea, but then I realized that burying the stems horizontally allows for root growth in the warmest, wettest, and most nutrient rich part of the soil.

http://www.trumpetflowers.com/text/care-and-grow-tomatoes.htm
When transplanting your tomato plants, make sure to remove the peat pot, as it can inhibit root growth. Also, if the plant is rootbound, then it is good to cut the bottom off of the root ball or criss-cross the root ball.
rootbound.

This website has a good explanation of trench-planting tomato plants.

Summary

Here are a few links to learn some more tips on growing tomatoes:


The video below contains an excellent set of tips on planting depth, organic fertilizer, addition of calcium, and removal of horn worms:


Saturday, July 19, 2014

Geek Gardening

Introduction

As a scientist, I am continuously seeking ways to monitor and quantify my world, including my garden.  After coming across this book on Amazon, I was enticed to search out the Geek Gardening community on the internet.

While this book does not incorporate computer programming (read below), it does apply science to improve your garden yield.  A combination of tips from this book and creative microcontroller programming could result in some really cool automated garden projects.

I am in the process of learning how to program/write in Python scripting language.  Like with gardening, I am very new at it and have a lot to learn.

Fortunately, there is a growing community of those who like to automate and quantify their gardening practice.  Most of the projects I have noticed involve the implementation of some variation of the open-source Arduino microcontroller or the Raspberry Pi mini-computer.  The simplest configurations of this marriage of programming and gardening usually involves creating a script to detect and react to a lack of water in the gardening system.  All of these projects are open source, which allows for your own creative input on how to improve them.

Gadgets

Garduino

The earliest implementation of programming to gardening that I have observed is the Garduino.  There is a how-to of the Garduino is on the very awesome website Instructables, which is geared towards the "maker" community.  Garduino can be modified to continuously measure humidity, temperature, and light.

The basic Garduino layout consists of using nails to determine soil moisture (electrical resistance of soil).  A pump, controlled by the Arduino, pumps water into the garden when the soil is dry.  The timing of the lights is also controlled by the Arduino board.  From MAKE magazine Volume 18.

Growerbot

For those of you not ambitious or brave enough to assemble a breadboard and program an Arduino by yourselves, there is the Growerbot, which uses the same technology, packaged in a cool wooden box. Growerbot is the child of a Kickstarter campaign.  The Growerbot comes with an advantage of being wireless internet ready, which can allow you to get instant online feedback on the status of your garden.  With the know-how, the Garduino concept can also be wi-fi enabled.

For $195, you can buy the preassembled and preprogrammed Growerbot.  For $120, you can buy the unassembled version. 

Botanicalls

The Botanicalls project is a small, leaf-shaped board that measures the soil moisture of your houseplants and sends you a Tweet when the soil is dry.
Although they deserve kudos for the design, the Botanicalls boards have a few serious drawbacks: they require a hard-wire power source, no wireless internet connection, and they are not made for outdoor conditions.

Ecoduino

The Ecoduino is another kit with the same intentions as the Garduino.  It's main components are a pump and soil moisture probe.

Open Sprinkler

Another extremely cool project is Open Sprinkler, an open-source sprinkler controller made by Ray Wang and Chris Anderson!  Ray has created a ready-to-use sprinkler controller and mobile web apps so that you can adjust your sprinkler system using your phone.  Open Sprinkler allows for 8 stations by itself.  With an expansion breadboard, the controller can handle up to 48 stations.  The community associated with Open Sprinkler has contributed modifications to the controller that allow the controller to check online weather reports to adjust watering accordingly

The newest preassembled edition of Open Sprinkler is $149.

Application

After finding some of the cool gadgets and kits, I wanted to see who was actually applying the technology to grow food.  Most of the automated gardens I found used aquaponics to grow their food.  Aquaponics is using circulating water to grow plants, usually in a gravel or floating mat medium.

This guy is passionate about aquaponics and garden automation:

This man is passionate about extreme urban gardening.  His website is Kijannigrows.

Here is another inventor implementing a similar variation of aquaponics.

One of the biggest applications of geek gardening is that of the marijuana growers.  They have definitely made plant growing a science, and many have embraced the route of gardening automation.  Many farms are indoor gardens, where every variable (including carbon dioxide, temperature, humidity, and nutrients) is closely monitored and controlled).  While I personally do not partake in the farming and growing of illicit drugs, I am impressed at the "high" bar that the growers set.  With the legalization of recreational marijuana in Washington and Colorado, hopefully growers will be more forthcoming with their techniques, as many of those techniques are directly applicable to vegetable gardens.   High Times included an extended article on the application of automation to indoor gardens. Tomato growers have a thing or two to learn about maximizing flowering of tropical plants.

Expanding the Concept

So, what can be done to improve the geek gardener community?  There are many ideas that I have that could be implemented.

As far as I can tell, there is a slight disconnect between the indoor and outdoor technology.  I think it would be cool to tie the concepts soil moisture monitoring to the mass watering capabilities of the Open Sprinkler.  Also, it would be a good idea to create an automatic soil moisture meter that measures moisture at different depths in the soil at the same point.  With information about the rate of water application, a multi-depth soil moisture probe could allow one to estimate water infiltration rate in the soil, and where a majority of the soil moisture resides.

Another interesting aspect of quantification would be fertilizer application. I would think that the easiest way to implement automation would be to incorporate liquid fertilizer in the watering system.

While soil moister is an important variable for maintaining plant health, it is not a direct measure of plant health.  Incorporating an infrared (IR) camera into the automated system would allow the gardener to continuously measure plant health.  IR cameras are increasingly becoming more accessible and are readily implemented by Raspberry Pi minicomputers.


One cool implementation of an inexpensive IR camera is the infragram photography project. The infragram photography project is another child of Kickstarter


Friday, July 18, 2014

Best Friend's Garden Transformation


This is a follow-up of an earlier post on our friend Brandon's garden.  He has done quite a bit of work planting and mulching.  He used coffee bags as mulch to keep the weeds down.

The 4x4 frames are the skeleton for a trellis system to support the melons - growing in the mounds.


Strawberries!


Rows and rows of peppers!  Note the use of soil-filled bags for diverting the flood irrigation.  The coffee bag mulch is permeable to water, but keeps the weeds down.

Tomatoes grown with a wire fence as a support for the tomato plants.  The plants will be tied and woven through the frame as they grow.

Green Skin Long Keepers tomatoes growing in the round cages. They ripen green, and their fruit can last for months after harvest.

Onions.

Peas and greens.


Some irrigation to support the flood irrigation.

Little chickens!

A pano of the garden progress.


Friday, July 11, 2014

Urban Garden Tour


We recently participated in the very awesome Wasatch Community Gardens Urban Garden and Farm Tour!  We were able to visit five different places where urban agriculture was flourishing.

The first stop we visited was the Simplephat Farm operated by the Bells.  We visited this farm first because it is in our neighborhood (Glendale).  This farm was built on the 0.5 acre yard of the Bell's home.  This is ultimate utilization of tillable land around your house.  They used row gardening, which seems more efficient for large amounts of food.  Some of the notable features of the Simplephat Farm included: an innovative chicken home with a trap door to scoop out chicken litter to use in compost, and long high tunnels with self ventilating doors - similar to, but on a larger scale than, a project I did earlier.

We left the Simplephat garden through the garden's back door, and came into a magical land of urban gardening.  It was as if we had left Glendale and stepped into an amazing place of vegetables and community.  We had come across some of the acreage of the Backyard Urban Garden (B.U.G.) Farms CSA, planted on the land shared by the Wasatch Commons Cohousing Community.

The Wasatch Commons consists of 26 houses, filled with people who share a commitment of an "intentional community."  An intentional community consists of citizens who make an effort to meet and get to know the people in their neighborhood.  I found a Deseret News article that summarized this community well, for those of you who are interested in the concept of the community.  What interested me about this community was the amount of food that they were growing.  It was awesome how much space was utilized for vegetables!
Wasatch Cohousing (picture from Google) is surrounded by gardened spaces!  Many of the members of the Wasatch Cohousing community are farming their property.  A lot of the fresh, local vegetables that you see sold at farm-to-table groceries and restaurants are grown in this block.

One of the BUG Farms plots.

This picture is from Wasatch Commons.  I included it because it shows a good application of a tomato support method that I mentioned in a previous post.


One of the BUG Farms plots.


The next farm we visited was in Sugar House, owned by one of the members of BUG Farms.  I liked the trellis she made, which she said was relatively easy to construct.  Also, not the fruit trees and straw mulch.


The next backyard we visited was an extremely efficient use of space for urban gardening.  The home had a very small back yard, but they managed to pack in a lot of stuff (see above).


Here were the beehives shown on the map above.  They were supported by a stone wall and had direct access the raised garden bed.  I was very close to the hives and did not feel uncomfortable about the bees, as they were not floating around in big bee clouds or anything.

Some tomatoes growing in the greenhouse


A view of the raised beds and some of the greenhouse.

The arbor/ pergola in the small yard.  It makes for a ton of grapes!

Here is a side view of the garden and chicken house.

We had a great time checking out gardens on the Urban Garden Tour.  I will finish with this picture of Brooke standing under another awesome arbor at a crazy (but nice) guy's house.